Archive
Install TensorFlow using Anaconda
If you search online, there will be so many posts on how to install TensorFlow on mac, some are older ones, some are new, hard to decide which one to follow. Let’s just make the flow easier so we can focus on the core part to explore the deep learning.
Please note that starting v1.2 TensorFlow no longer support GPU on mac-os, so in the followings, we will just install the CPU version. It’s good to start with something simple. There are two ways of install it under Anaconda.
Use ‘conda’ command which can be quite straight forward.
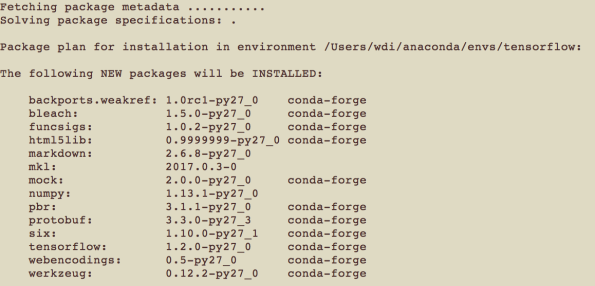
# Python 2.7
$ conda create -n tensorflow python=2.7

$ source activate tensorflow
(tensorflow)$  # Your prompt should change

# Use 'conda' command: Linux/Mac OS X, Python 2.7/3.4/3.5, CPU only:
(tensorflow)$ conda install -c conda-forge tensorflow
or use the pip command
(tensorflow)$ pip install --ignore-installed --upgrade \
 https://storage.googleapis.com/tensorflow/mac/cpu/tensorflow-1.2.1-py2-none-any.whl
References:
You can follow up to install keras and ipython within the env:
# note this will downgrade tensor flow to 1.0
conda install -c conda-forge keras=2.0.2
conda install ipython
4 Steps to Change X-code Project Version
After updating your projects, you may want to give it a new version number. Here are four steps of how to change it:
Step 0: Click the target — you can see your current version name (Opencv Tutorial)

Step 1: (slowly)Double Click the name(in blue), you will be able to change the name (Opencv Tutorial1.1)

Step 2: Now add a new scheme


Step 3: X-code should already automatically detect the changes, so simply click OK. You are done Now:)

Config mex for Matlab on macOS
I have been trying a lot to make the ‘mex’ working on my mac. But a lot of errors such as can’t find the ‘float.h’, although it is there! multiple tries… finally fix this problem today 🙂
I searched a little bit and finally found this link is quite useful. Basically, you have to make some changes of the ‘mexopts.sh’ file. I have Matlab 2012a, and x-code 4 installed. I didn’t try the suggestion of downloading Xcode3, but the following suggestions work. Find the block of ;; maci64, and change MACOSX_DEPLOYMENT_TARGET to ‘10.6’. Also remove -isysroot in CFLAGS and CXXFLAGS (there are two -isysroot). Here’s my final mexopts.sh file.
    ;;
 maci64)
 #----------------------------------------------------------------------------
 CC=gcc
 SDKROOT='/Developer/SDKs/MacOSX10.6.sdk'
 MACOSX_DEPLOYMENT_TARGET='10.6'
 ARCHS='x86_64'
 CFLAGS="-fno-common -no-cpp-precomp -arch $ARCHS -mmacosx-version-min=$MACOSX_DEPLOYMENT_TARGET"
 CFLAGS="$CFLAGS -fexceptions"
 CLIBS="$MLIBS"
 COPTIMFLAGS='-O2 -DNDEBUG'
 CDEBUGFLAGS='-g'
 #
 CLIBS="$CLIBS -lstdc++"

 CXX=g++
 CXXFLAGS="-fno-common -no-cpp-precomp -fexceptions -arch $ARCHS -mmacosx-version-min=$MACOSX_DEPLOYMENT_TARGET"
 CXXLIBS="$MLIBS -lstdc++"
 CXXOPTIMFLAGS='-O2 -DNDEBUG'
 CXXDEBUGFLAGS='-g'
How to map drive through MAC to PC
This is what I found recently, which is very useful.
1. In the Finder, click on the Go menu, selectConnect to Server.
2. Enter the address to where the resource is you wish to map.
i.e. smb://www.domain.com/foldername
or if you have the ip address:
i.e. smb://http://100.250.95.98/YOURSharedFolderName
3. Enter your network password when prompted.
4. A new icon should appear on the desktop. That is your mapped network drive.
Fix UIActionSheet Cancel Button
I found that using the UIActionSheet, it seems that the “Cancel” button does not function well. It turns out to be a normal problem, where here gives the right answer. I followed the instruction and changed the code (self — is the
from
[self.actionSheet showInView:self.view]; // show from our table view (pops up in the middle of the table)
to
[self.actionSheet showInView:self.parentViewController.tabBarController.view];
ios Image Proc
Well opencv is a good thing, but sometimes really hard to do the configuration. Depends on your purposed, if just for simple image processing, there are actually several example codes where you can learn from .
1) GLImageprocessing by Apple
2) http://www.cocoaintheshell.com/
3) http://code.google.com/p/simple-iphone-image-processing/
Opencv Test on Xcode
I pre-installed opencv (2.3.1) for python binding, but haven’t tried it out in Xcode. Here’s what I found that works on my Mac. I am using Xcode4.3, Mac Lion 10.7.3.
Just to clarify, I almost followed this link, which turns out working well for the example code.
– Make a new project and choose “Command Line Tool”, choose C++ as the type for the project. Xcode will automatically generate a main.cpp for you.
– Go to project setting, select all, among which search the “Header search path”, and add “/opt/local/include”
– Create a folder for your ‘framework’ on the left panel, let’s say, name it as “opencv-Frameworks”, and right click it use “Add files to..”. You will going to add three files which are located at </opt/local/lib>. They are: libopencv_ml.2.3.1.dylib, libopencv_highgui.2.3.1.dylib, libopencv_core.2.3.1.dylib
– You don’t have to copy those items, but just an option 🙂
– Now, copy the demo code in the above link to your main.cpp, click build+run, you should see a pop up window like this:

– You can find a completed working project here.
Python on MAC (Step 0)
Ok, well, here’s what I was missing when getting my MAC.
Strongly suggest to read this if you are a new MAC rookie who use python: http://docs.python.org/using/mac.html
Setup Apache Server on MAC
To Set Up a Server on my mac.
- Goto Preference: Sharing, Check the Sharing View
- Now the apache is running, to do a test: put: localhost in your browser, you will see “it works!”
- When you check the box for Sharing View, you will be notified that there are two different websites are now available on your computer
- 1. Personal Website: http://you-computer-name/~youraccountname
- The Sites folder in in your home folder : ~/Documents/Sites
- 2. Computer Website: http://your-computer-name/
- The Site Folder in <Library/WebServer/>
- There are 3 subfolders under this folder: a) CGI-Executable; b) Documents; c) Share
- You should put your executables in this folder, such as the below python code:
#!/usr/bin/python
print “Content-type: text/html”
print
print “<html><head>”
print “”
print “</head><body>”
print “Test Page”
print “</body></html>”
Name it as ‘test.py’, and in the terminal change it to
$ sudo chmod 755 test.py
Now you can run it by : http://localhost/cgi-bin/test.py
Here’s a useful link: http://www.editrocket.com/articles/python_apache_mac.html
Also here’s how to share a folder: http://www.macworld.com/article/1140370/pythonserver.html
In Terminal, first cd to the folder you’d like to make available via the Web server. For example, cd ~/Pictures to switch to your user’s Pictures folder. Next, you activate Python’s built-in Web server with this command: python -m SimpleHTTPServer (and yes, capitalization counts). Press Return, and you’ll see a message stating Serving HTTP on 0.0.0.0 port 8000 .... The important bit there is the port number (8000). (You can use a different port number by simply including it at the end of the command, like so: python -m SimpleHTTPServer 8080.) To access the server from the machine you’re running the Python server on, switch to a Web browser, and enter http://localhost:8000 (replace 8000 with the port you used, if you didn’t use the defaut) in the URL bar. When you press Return, you’ll see a listing of all files in the directory. Depending on what types of files are there, and which browser you’re using, you can then click on files to view them in the browser. In my testing, Firefox works better than Safari, as Safari wants to download file types it doesn’t know how to handle while Firefox will often let you open them with a helper application. To access the server from another machine on your network, you need to know the server computer’s name. You can find this in the Sharing System Preferences panel, in the aptly-named Computer Name section of the panel. Just below the computer’s actual name, you’ll see a line that begins Computers on your local network can access…, followed by the name they’ll need to use to do so. Typically, this is simply the Computer Name followed by .local—so if the machine’s name is OctoMac, for instance, you can then access the server by entering http://OctoMac.local:8000 in your browser’s URL bar.
Tutorial Sites For iOS Developer
Cocoa & Objective-C is the base of Mac Os X.
Objective-C Language is an extensive to C and makes C OO(Object Oriented).
ObjectiveC Quick Learning:
ObjectiveC Tutorial:
http://www.raywenderlich.com/tutorials ( very cool one)
How to generate certificat signing request ( I like their QA part, include a lot of basic points you will need to start your ios development):
The developer video site:
Delegate is sth like callback function or notify mechanism. When some events happens, we call the corresponding method defined in the delegate class. As to application delegate, the delegate object specified in the UIApplicationMain is responsible to respond to the event which will affect the whole application. For example, when the application is about to run out of memory, the method ‘didReceiveMemoryWarning’ is invoked, and this is defined by an ObjectiveC protocal——UIApplicationDelegate. This protocal defines when and which delegate method should be invoked. For an application delegate class, it should declare in its .h file that it will implement a certain protocal , and then implement all the method which was not taged with ‘optional’ in the protocal.
For example:
There are a lot of other delegate protocal defined in the iPhone. If we want to implement some delegate class to handle certain events generated from a text field in the UI, we can choose UITextFieldDelegate protocal. This protocal defines the methods which will be invoked by the events which are generated by a text, like content changed.
The last thing we need to do is to assign the delegate class of a certain control or view with the delegate class we just implemented.
Some useful links:
iPhone Camera Focussing:
http://stackoverflow.com/questions/8065422/iphone-camera-focussing
AVVCam:
http://red-glasses.com/index.php/tutorials/ios4-take-photos-with-live-video-preview-using-avfoundation/
http://www.musicalgeometry.com/?p=1273
OpencvFrameWork for iOS:
http://aptogo.co.uk/2011/09/opencv-framework-for-ios/
UIColor CheatSheet: ~~~ I love this one 🙂
http://foobarpig.com/iphone/uicolor-cheatsheet-color-list-conversion-from-and-to-rgb-values.html

The Coordinates of CGRectMake

Install OpenCv with Python Binding on MacOS
I had tried several versions of install opencv on my mac that can be used in python.
Here are lessons — use the python provided by MacOS, you may have the following problem if you are using other versions.
Steps:
– Use python by MacOS, which you should be able to finda and locate, e.g. the link /usr/bin/python (my version is Python 2.7)
I found that I can not use the python I installed somewhere else, such as </Library/Frameworks/Python.framework/Versions/2.7/>
– I used the brew to install opencv:
http://opencv.willowgarage.com/wiki/Mac_OS_X_OpenCV_Port?highlight=%28%28InstallGuide%29%29
$sudo brew install opencv
It enventually install it to </usr/local/Cellar/opencv/2.3.1a>
– Next step, you need to add the path </usr/local/Cellar/opencv/2.3.1a/lib/python2.7/site-packages> to your PYTHONPATH
If you check the sit-packages folder, it should include two files: cv.py and cv2.so
So, change your ~/.profile to include the following line:
export PYTHONPATH=”/usr/local/Cellar/opencv/2.3.1a/lib/python2.7/site-packages:${PYTHONPATH}”
Otherwise, whenever you would like to import the cv, you will have to first include the path in your python code, something like this:
sys.path.append(‘/usr/local/Cellar/opencv/2.3.1a/lib/python2.7/site-packages’)
Now, time to do the test:
I couldn’t find the example folder of python by the package installed by brew.
So I went ahead and use the previous download one, which is a full package opencv:
$ls ~/Documents/OpenCV-2.3.1/samples/python (where you will be able to find the delaunay.py file, then go ahead to run it)
$ python ~/Documents/OpenCV-2.3.1/samples/python/delaunay.py
Nice , now it’s running, finally 🙂

