Archive
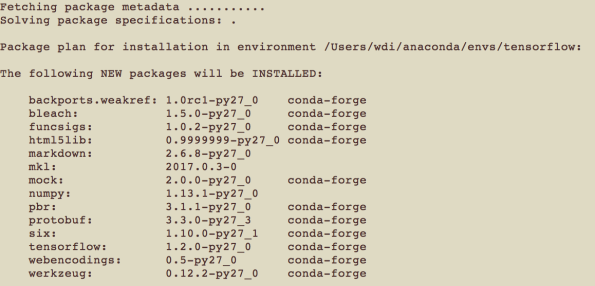
Install TensorFlow using Anaconda
If you search online, there will be so many posts on how to install TensorFlow on mac, some are older ones, some are new, hard to decide which one to follow. Let’s just make the flow easier so we can focus on the core part to explore the deep learning.
Please note that starting v1.2 TensorFlow no longer support GPU on mac-os, so in the followings, we will just install the CPU version. It’s good to start with something simple. There are two ways of install it under Anaconda.
Use ‘conda’ command which can be quite straight forward.
# Python 2.7
$ conda create -n tensorflow python=2.7

$ source activate tensorflow
(tensorflow)$  # Your prompt should change

# Use 'conda' command: Linux/Mac OS X, Python 2.7/3.4/3.5, CPU only:
(tensorflow)$ conda install -c conda-forge tensorflow
or use the pip command
(tensorflow)$ pip install --ignore-installed --upgrade \
 https://storage.googleapis.com/tensorflow/mac/cpu/tensorflow-1.2.1-py2-none-any.whl
References:
You can follow up to install keras and ipython within the env:
# note this will downgrade tensor flow to 1.0
conda install -c conda-forge keras=2.0.2
conda install ipython
Pig Error for string to long
Gotten error message as:
Error: java.lang.ClassCastException: java.lang.String cannot be cast to java.lang.Long
The original pig script is as:
score = FOREACH score_account_kpi_avro
GENERATE FLATTEN(STRSPLIT(uid,’:’)) as (account_id:chararray,
date_sk:chararray, index:long), (double)predictedLabel, (double)predictedProb; — (xxxxxxxx,2016-09-30,221905,221905.0,221905.6822910905)
Up to this stage, if you dump some examples, it will be fine. But if proceed joining other data or computing something, you’ll get the error of “java.lang.ClassCastException: java.lang.String cannot be cast to java.lang.Long”, which might be hard to tell why it happens.
What is happening here is when you do the split, you can’t cast one of the split entry into long directly (index:long). The right way is to just get it as chararray type, and cast it in the downstrem process, for example:
score = FOREACH score GENERATE account_id AS account_id, (double)index as index,
(double)predictedLabel as predictedLabel, (double)predictedProb as predictedProb;
Installing mxnet
I wanted to install the newly released deep learning package “mxnet” on my mac. Here’s the instruction site: http://mxnet.readthedocs.org/en/latest/build.html#building-on-osx
It mostly comes fine, but I did have few problems including some linking error.
One is with ‘libtbb.dylib’, it keep complaining that it couldn’t find the lib, but when I check it it is in the right folder `/usr/local/lib` — which is actually a soft link to “/usr/local/Cellar/tbb/4.4-20150728/lib/”. The problem is actually because of the false configuration in opencv.pc. So what I did was to open “/usr/local/lib/pkgconfig/opencv.pc” (which provides the meta-information for pkg-config) and change -llibtbb.dylib to -ltbb.
I also got other few linking errors for libJPEG.dylib, libtiff.dylib and libpng.dylib. What I found is that they points to few libs like “/usr/local/Cellar/jpeg/8d/lib/libjpeg.dylib” or “/usr/local/Cellar/libtiff/4.0.6/lib/libtiff.dylib” but it seems that they are not the ones expected.


To fix this:
# creates the locate database if it does not exist, this may take a longer time, so be patient
sudo launchctl load -w /System/Library/LaunchDaemons/com.apple.locate.plist#do locate to locate the actual lib, for example
locate libJPEG.dylib# suppose you got the path from the above command as abspath_to_lib, if the lib already exist in /usr/local/lib, you can remove it first.
ln -s abspath_to_lib /usr/local/libJPEG.dylib
Now, you can run one mnist example by `python example/image-classification/train_mnist.py`. It should display the following results:
Using spark-shell
As a new learner for spark/scala, I found using spark-shell for debugging is very useful. Sometimes, I just feel it like the ipython shell. There are few tricks of using it:
0. Do ./spark-shell -h will give you a lot of help information
1. Load external file in spark-shell:
spark-shell -i file.scala or in-shell do
scala> :load your_path_to.scala
2. Remember when you start the shell, the SparkContext(sc) and the SQLContext (sqlContext) has already loaded. If you are not in the spark shell — remember to create such in your program
3. You can import multiple things like this: scala> import org.apache.spark.{SparkContext, SparkConf}
4. You can use `spark-shell -jars your.jar` to run a single-jar spark module from the start, and then you will be able to `import somthing_from_your_jar’ from your just added library.
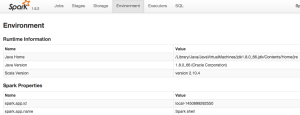
5. If you install spark locally, you can open it’s web ui(port 4040) for validation purpose: http://localhost:4040/environment/
6. To re-use what you have entered into the spark-shell, you can extract your input from the spark shell history which is in a file called “.spark-history” in the user’s home directory. For example `tail -n 5 .spark_history > mySession1.scala`. Next time, you can use (1) to reload your saved scala session. In the shell session, if you want to check history, you can simply do `scala> :history`
7. A library called scalaplot can help you to do some visual investigation.
8. Use $ SPARK_PRINT_LAUNCH_COMMAND=1 ./bin/spark-shell to print launch command of spark scripts
9. Open spark-shell and execute :paste -raw that allows you to enter any valid Scala code, even including package.
ps. to install spark on your mac, you can simply use homebrew
$brew update
$brew install scala
$brew install sbt
$echo ‘SBT_OPTS=”-XX:+CMSClassUnloadingEnabled -XX:PermSize=256M -XX:MaxPermSize=512M -Xmx2G”‘ >> ~/.sbtconfig
$brew install apache-spark
After the installation, you can update your PATH variable to include the path to spark/bin.
You can also set up pyspark locally, here are some instructions: https://documentation.altiscale.com/using-spark-with-ipython
One short but nice Scala book

Few Python base Deep Learning Libs
Lasagne: light weighted Theano extension, Theano can be used explicitly
Keras: is a minimalist, highly modular neural network library in the spirit of Torch, written in Python, that uses Theano under the hood for fast tensor manipulation on GPU and CPU. It was developed with a focus on enabling fast experimentation.
Pylean2: wrapper for Theano, yaml, experimental oriented.
Caffe: CNN oriented deep learning framework using c++, with python wrapper, easy model definitions using prototxt.
Theano: general gpu math
nolearn: a probably even simpler one
you can find more here.
For Lasagne and nolearn, they are still in the rapid develop stage, so they changes a lot. Be careful with the versions installed, they need to match each other. If you are having problems such as “cost must be a scalar”, you can refer link here to solve it by uninstall and reinstall them.
pip uninstall Lasagne
pip uninstall nolearn
pip install -r https://raw.githubusercontent.com/dnouri/kfkd-tutorial/master/requirements.txtForward to the past
I was listening to Hinton’s interview (on CBC Radio: http://nvda.ly/OioP3). He mentioned multiple times of possible break through on natural language understanding by using deep learning technology. It is definitely true that human reasoning is such a difficult task to modeling as it is so complex to be abstracted easily. While I watch my little boy grows, I was amazed every time he shows a new ability, ability to do something, and ability to understand/perceive something. When training my own model (on image instead), I start to gain more understanding of the model. Structure determines the function. In most cases, the training is more like a process of “trial and error”. It’s a big black box with complex structures and connections. One of the biggest advantage of such learning network is its ability to automatically learn the representation, or say to abstract things. With abstraction in our logical system, we are able to organize things, dissect things, compose things, and possibly to create new things. Given what the network can already see/imaging (http://goo.gl/A1sL8N), it’s likely down the few years later, a network on human language could help us to translate the languages that went extinct thousands years by simply seeing over and over those scripts. This would be so wonderful cause so many ancient civilization will start shine again. Maybe I should call this “Forward to the Past”.
Remote access ipython notebooks
Original post: https://coderwall.com/p/ohk6cg/remote-access-to-ipython-notebooks-via-ssh
remote$ipython notebook --no-browser --port=8889
local$ssh -N -f -L localhost:8888:localhost:8889 remote_user@remote_host
To close the SSH tunnel on the local machine, look for the process and kill it manually:
local_user@local_host$ ps aux | grep localhost:8889
local_user 18418  0.0  0.0  41488   684 ?        Ss   17:27   0:00 ssh -N -f -L localhost:8888:localhost:8889 remote_user@remote_host
local_user 18424  0.0  0.0  11572   932 pts/6    S+   17:27   0:00 grep localhost:8889

local_user@local_host$ kill -15 18418
Alternatively, you can start the tunnel without the -f option. The process will then remain in the foreground and can be killed with ctrl-c.
On the remote machine, kill the IPython server with ctrl-c ctrl-c.
Note: If you are running GPU & Theano on your remote machine, you can launch the notebook by:
THEANO_FLAGS=mode=FAST_RUN,device=gpu,floatX=float32 ipython notebook –no-browser –port=8889
Another simple way is to do the following (adding ip=*):
# In the remote server
$ THEANO_FLAGS=mode=FAST_RUN,device=gpu,floatX=float32 ipython notebook –no-browser –ip=* –port=7777
then you can reach the notebook from http:// the-ip-address-of-your-remote-server:7777/
Few things when using Eclipse
Workspace is locked.
If you encounter the situation which Eclipse says:
“Could not launch the product because the associated workspace is currently in use by another Eclipse application.” or “Workspace in use or cannot be created, chose a different one.”
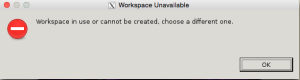
Just delete the .lock file in the .metadata directory in your eclipse workspace directory.
Install Eclipse IDE and Java/C++ development tools on Ubuntu12.04 LTS Precise Pangolin using command line
Original link: http://www.inforbiro.com/blog-eng/ubuntu-12-04-eclipse-installation/
1) Open a terminal and enter the command
sudo apt-get install eclipse-platform
2) After Eclipse is installed you can install development plugins based on your needs, e.g.:
will install Java Development Tools (JDT) package for Eclipse
sudo apt-get install eclipse-jdt
will install C/C++ development tools packages for Eclipse
sudo apt-get install eclipse-cdt
Replace tab with spaces in Eclipse CDT:
Original from here.
For CDT: Go to Window/Preference -> C/C++ -> Code Style -> Formatter -> New (create a new one because the built in profile can not be changed) -> MyProfile (choose one name for the profile) -> Indentation, Tab Policy –> Spaces only
Random notes
If you type relentless.com into browser, you will be re-routed to Amazon. Amazon is introducing their new Fire phone, which includes the OCR technology called firefly to recognize movies, songs, etc. Certainly interesting, but look forward to see how good it may perform and how fast when it finally comes out.
Installing Mercurial on Mac
$ brew install mercurial
If you see errors like:
clang: error: unknown argument: '-mno-fused-madd' [-Wunused-command-line-argument-hard-error-in-future] clang: note: this will be a hard error (cannot be downgraded to a warning) in the future
you can disable the ‘warning’ (which is now showing as error ) by:
$ ARCHFLAGS=-Wno-error=unused-command-line-argument-hard-error-in-future \
brew install mercurial
Again, after the install successed, if you see linking error:
Error: Could not symlink file: /usr/local/Cellar/mercurial/2.9/share/man/man5/hgrc.5/usr/local/share/man/man5 is not writable. You should change its permissions.
You can change the permission. It is said to be safe to change the permission for the whole /usr/local. If you don’t want to do so, just do it for this case
$ sudo chown -R 'your-user-name' /usr/local/share/man/man5
 $ brew link mercurial
Deep learning on visual recognition task
The current benchmark on visual recognition task:
Install Deepnet on Mac
This may help to have Nitish’s deepnet work on your mac. The code is very clean, most important thing is to follow the instructions here https://github.com/nitishsrivastava/deepnet/blob/master/INSTALL.txt
(1) DEPENDENCIES
a) You will need Numpy, Scipy installed first, because the tools is largely python. Simply way is to use ‘brew‘. For example, follow the instructions here.
b) CUDA Toolkit and SDK.
Follow the instructions(CUDA5.5): http://docs.nvidia.com/cuda/cuda-getting-started-guide-for-mac-os-x/
NVIDIA CUDA Toolkit (available at http://developer.nvidia.com/cuda-downloads)
I followed both instruction on http://docs.nvidia.com/cuda/cuda-getting-started-guide-for-mac-os-x/
and instruction from the deepnet to set the system paths:
export PATH=/Developer/NVIDIA/CUDA-5.5/bin:$PATH
export DYLD_LIBRARY_PATH=/Developer/NVIDIA/CUDA-5.5/lib:$DYLD_LIBRARY_PATH
Follow the deepnet instruction: for mac, it is the ‘~.profile’, edit/add to the file:
export CUDA_BIN=/usr/local/cuda-5.0/bin
export CUDA_LIB=/usr/local/cuda-5.0/lib
export PATH=${CUDA_BIN}:$PATH
export LD_LIBRARY_PATH=${CUDA_LIB}:$LD_LIBRARY_PATH
First make sure CUDA installed right:
install the examples: cuda-install-samples-5.5.sh <dir>
and go to /Developer/NVIDIA/CUDA-5.5/samples, choose any simple example subfolder, go into and do ‘make’, after make completed, you can do a simple test.
(c) Protocol Buffers.
Download the file: http://code.google.com/p/protobuf/
Follow the instructions to compile/install it. It will be install (generally in /usr/local/bin/protoc). It was said that you only need to include the directory that contains ‘proc’, so add to path:
export PATH=$PATH:/usr/local/bin
(2) COMPILING CUDAMAT AND CUDAMAT_CONV
For making the cuda work, do ‘make’ in cudamat , but change all the ‘uint’ to ‘unsigned’ in file: cudamat_conv_kernels.cuh
or do a #define uint unsigned
Then run ‘make’ in cudamat folder
(3,4) STEP 3,4
continue follow step 3, and 4 on https://github.com/nitishsrivastava/deepnet/blob/master/INSTALL.txt. and you will get there.
Note (1): I did not install separately for cudamat library by Vlad Mnih and cuda-convnet library by Alex Krizhevsky.
Note (2): If you do NOT have GPU: another alternative is to not use GPU, most recent mac come with NVIDIA 650, but some old version may use intel graphical card. In that case you can still do the deep learning part, but using eigenmat. The drawback is that it will be very slow.
Install eigen from here: http://eigen.tuxfamily.org/index.php?title=Main_Page
if given error <Eigen/..> can not found, change to “Eigen/…”
also you need to change python path, including path to where ‘libeigenmat.dylib’ located. It it still fails to find: libeigenmat.dylib. It may not hurt to give it a direct path, edit the file <eigenmat/eigenmat.py>.
_eigenmat = ct.cdll.LoadLibrary(‘the-path-to/libeigenmat.dylib’)
Rectifier Nonlinearities
There are multiple different choice of activation functions for a NN. Many work has shown that using Rectified linear unit (ReLU) helps improve discriminative performance.
The figure below shows few popular activation functions, including sigmoid, and tanh.

sigmoid: g(x) = 1 /(1+exp(-1)). The derivative of sigmoid function g'(x) = (1-g(x))g(x).
tanh : g(x) = sinh(x)/cosh(x) = ( exp(x)- exp(-x) ) / ( exp(x) + exp(-x) )
Rectifier (hard ReLU) is really a max function
g(x)=max(0,x)
Another version is Noise ReLU max(0, x+N(0, σ(x)). ReLU can be approximated by a so called softplus function (for which the derivative is the logistic functions):
g(x) = log(1+exp(x))
The derivative of hard ReLU is constant over two ranges x<0 and x>=0, for x>0, g’=1, and x<0, g’=0.
This recent icml paper has discussed the possible reasons that why ReLU sometimes outperform sigmoid function:
- Hard ReLU is naturally enforcing sparsity.
- The derivative of ReLU is constant, as compared to sigmoid function, for which the derivative dies out if we either increase x or decrease x.
Exercising Sparse Autoencoder
Deep learning recently becomes such a hot topic across both academic and industry area. Guess the best way to learn some stuff is to implement them. So I checked the recent tutorial posted at
ACL 2012 + NAACL 2013 Tutorial: Deep Learning for NLP (without Magic)
and they have a nice ‘assignment‘ for whoever wants to learn for sparse autoencoder. So I get my hands on it, and final codes are here.
There are two main parts for an autoencoder: feedforward and backpropagation. The essential thing needs to be calculated is the “error term”, because it is going to decide the partial derivatives for parameters including both W and the bias term b.
You can think of autoencoder as an unsupervised learning algorithm, that sets the target value to be equal to the inputs. But why so, or that is, then why bother to reconstruct the signal? The trick is actually in the hidden layers, where small number of nodes are used (smaller than the dimension of the input data — the sparsity enforced to the hidden layer). So you may see autoencoder has this ‘vase’ shape.

Thus, the network will be forced to learn a compressed representation of the input. You can think it of learning some intrinsic structures of the data, that is concise, analog to the PCA representation, where data can be represented by few axis. To enforce such sparsity, the average activation value ( averaged across all training samples) for each node in the hidden layer is forced to equal to a small value close to zero (called sparsity parameters) . For every node, a KL divergence between the ‘expected value of activation’ and the ‘activation from training data’ is computed, and adding to both cost function and derivatives which helps to update the parameters (W & b).
After learning completed, the weights represent the signals ( think of certain abstraction or atoms) that unsupervised learned from the data, like below:

Andrew Ng’s talk @ TechXploration
Here’s video recording for Andrew Ng’s talk @ TechXploration
Abstract: How “Deep Learning” is Helping Machines Learn Faster
What deep learning is and how its algorithms are shaping the future of machine learning; computational challenges in working with these algorithms; Google’s “artificial neural network,” which learns by loosely simulating computations of the brain.
1: http://youtu.be/UfKHi8cFWBQ
2. http://youtu.be/pAjwoDEOTzU
3. http://youtu.be/sREaRN0uY1A
4. http://youtu.be/NvMCM82dDlc
5. http://youtu.be/Rrq0-xtbGcE
6. http://youtu.be/qGkEgL_Tye4
